- Day 1 – Setting up the Project
- Day 2 – Writing the Tests
- Day 3 – Designing the backend
- Day 4 – Designing the Wicket components
- Day 5 – Putting it all together
1-Setting up the project (Ngày 1) :
Wicket
is a Java web application framework which allows “Designers” (people
good with Dreamweaver) and “Developers” (people good with Java and
Databases) to collaborate on a project with minimal chances of stepping
on each other’s toes or wearing each other’s hats.
The beauty of Wicket
is that it uses plain xhtml pages as it’s templating markup. This
means that html pages can be loaded into Dreamweaver (or whatever tool
the Designer is comfortable with) and they will look very close to the
same as they would when rendered on the deployment web server.
Here is how the final page looks if you were to simply load the page into a web browser (or Dreamweaver) from your hard drive:

You can of course stick with the typical “Java source files along side html” convention if you wish, but I find it much cleaner to separate them during design time, and have Maven combine them only at build time into the target war (which it will gladly do automagically).
 To be precise, the command I used was:
Eclipse
For eclipse you’ll also have to set the M2_REPO classpath variable for the workspace your project resides under. Do this by entering the following command:
Netbeans
Netbeans supports maven out of the box, just “Open Project” and choose the mysticpaste directory that contains the pom.xml file
When generating the project files through Maven, the project is setup such that classpath entries point to your local Maven repository (i.e. ~/.m2/repository, or C:Documents and Settingsyourusername.M2repository on Windows). It also sets up src/main/java, src/main/resources as “source folders”. You may add other folders to the source folder list as per your IDE if needed, the only thing you have to remember is if you ever use mvn eclipse:clean followed by mvn eclipse:eclipse again, those other source folders will have to be readded through your IDE. Instead, you should add the source/resource folders directly to your pom.xml, this way they will be maintained.
We add the following to our pom.xml:
We add the following to our pom.xml:
Enabling filters is quite easy, we open up the pom.xml file and find the section for <resources> and set the value for the <filtering> element to true as follows:
applicationContext.xml
Conclusion
Although it’s quite easy to get started with the Maven QuickStart project it is sometimes a bit frustrating putting some of the additonal pieces together. Building to several environments, setting up depenencies not included in the QuickStart project and structuring your project in an effort to make life easy for yourself as a developer and for your designer.
Comment:
In mysticpaste app, Wicket used SpringFamework with role of Beans Factory to createnew objects and manage Hibernate Transaction" at Dao tier.
2-Writing the tests (Ngày 2)
http://www.mysticcoders.com/blog/5-days-of-wicket-writing-the-tests/
3-Designing the backend (Ngày 3)
http://www.mysticcoders.com/blog/5-days-of-wicket-day-designing-the-backend/
4-Designing the Wicket components (Ngày 4)
http://www.mysticcoders.com/blog/5-days-of-wicket-the-ui/
5-Putting it all together(Ngày 5)
Here we are, the last day of our Apache Wicket series. While there was only one day that focused on Apache Wicket, we’ve laid the groundwork needed to get a J2EE project that uses a web framework off the ground. And step-by-step, if you follow along with the team on all 4 days preceding, you will have a greater understanding of how everything is put together, and why.
And as you can see, the actual work that went into the front-end of MysticPaste, didn’t take very long at all. And as good community citizens, we’ve made the finished product and source code available.
MysticPaste.com – our implemented pastebin based on the code examples and tutorials shown throughout this series
MysticPaste Source – the source code for the pastebin, open source.
On Day 1, we learned the many steps it takes to put together a project that can be worked on in a team environment. We’ve enjoyed your comments on different methodologies, and some we will definitely take into account. The biggest thing to take away from that day, is to understand the underpinnings of why things are where they are in a project, and how adherence to the fairly accepted Maven standard structure can make life much much easier.
On Day 2, we ran through some basics on Mocks, and with a bit of upfront design on interfaces, a testing harness is available for building out the backend. We also learned how to take Unitils and extend our tests passed just a functional unit, and move through many layers of the built system, and ensure we go a bit beyond just code coverage.
On Day 3, with unit tests in place, we felt safe writing some implementations so we moved the codebase from failing tests due to no implementation, to working tests. We learned a bit about designing your domain model based on requirements and design discussions, and molding the service and persistence layer to support your business goals.
On Day 4, we got to the most exciting part of our journey, Apache Wicket. The article walked you through some of the basics of putting a page together using markup inheritance, and amazingly enough, how this simple act removes the need for technology so common in the MVC world to support this. Best of all, because its all in Java, ultimately you can actually use your IDE and refactor or debug as needed. Each of the most basic components with forms, and display, and the wicket-based tags that act as extensions to your HTML pages, were reviewed with links off to the Javadoc for further discovery. One of the many reasons to love Wicket, is the clear separation of functional concerns, no code in your template pages, it’s just HTML.
If you’re like the members of the Mystic team, you will CRAVE more. More information, more discovery into how we can fully integrate Apache Wicket as a tool in our arsenal. Aside from downloading the distribution and following along with our tutorial, here are some options ahead:

7-Comment
"5 days of wicket" is a medium project to explore wicket framework for beginners. This is a framework that allows specialization of "design" team and code team so that java web applications will have UI more attractive. Notes that UI is a problem so that many java applications are "failed" in Việt Nam. Spring still is an IoC framework used in business layer. Thanks you Wicket!
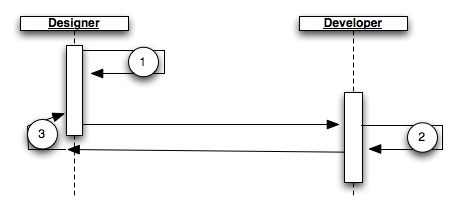
Workflow
The basic workflow involved in creating and maintaining html rendered by Wicket is as follows:- The Designer creates the html for the website and fleshes it out with “mock” sections. For instance in the application we intend to create during our Five Days of Wicket will be a pastebin application called “Mystic Paste”. In our application we’ll have an “Add Code to Mystic Paste” page, mock data might include some user created content in the textarea of the page. All css/images, etc… are setup such that if they were to be put on a webserver, everything would work.
- The Developer needs to flesh out the dynamic areas of the webpage,
that is, he needs to instruct Wicket where it will need to show
information from the server. The developer does this by decorating the
designer’s html page with special Wicket tags and attributes. Because
these tags and attributes are just considered part of another namespace
separate from xhtml’s, editors like Dreamweaver and browsers will simply
ignore them
- It is important to note: The developer will still keep the “mocked” sections of the page intact, this is so the page renders and looks fleshed out on its own. The mocked sections will be replaced by real data when rendered by Wicket. - The Developer hands the file back to the Designer. The Designer is free to make further edits, so long as he/she does not remove or manipulate the Wicket tags and attributes present in the file. If the Designer does need to remove any Wicket tags or attributes, they need to consult the Developer as such an action will “break” the webpage when Wicket renders it.
Example Wicket Page
Here is an example of a Wicket page. This example was taken from Manning Publishing’s book “Wicket in Action”:<html>
<head>
<title>Cheesr - Making cheese taste beta</title>
<link href="style.css" rel="stylesheet" />
</head>
<body>
<div id="container">
<div id="header">...</div>
<div id="contents">
<div id="main">
<div wicket:id="cheeses" class="cheese">
<h3 wicket:id="name">Gouda</h3>
<p wicket:id="description">Gouda is a Dutch...</p>
<p>
<span wicket:id="price">$1.99</span>
<a wicket:id="add" href="#">add to cart</a>
</p>
</div>
<wicket:remove>
<!-- this section will be removed by wicket,
it's only purpose is to flesh out the page -->
<div class="cheese">
<h3>Emmental</h3>
<p>Emmental is a Swiss che...</p>
<p>
<span>$2.99</span>
<a href="#">add to cart</a>
</p>
</div>
</wicket:remove>
</div>
<div id="cart">...</div>
</div>
</div>
</body>
</html>
This looks almost 100% like a normal webpage would look, the only
difference is the addition of the “wicket:XXX” attributes and tags
sprinkled through the document. The parts of the document using the
special Wicket namespace modifiers will be replaced/removed in the final
markup when Wicket renders the page to the user’s browser. Notice the
“<wicket:remove>” element? This is where your designer can put a
“mocked” version of what that area of the page should look like. You as
a developer can take that mocked html and divide it out into a template
that is dynamically driven from the backend.Here is how the final page looks if you were to simply load the page into a web browser (or Dreamweaver) from your hard drive:

Preparing for Setup
Deviating a bit from the Standard Wicket Convention
One of the first things a developer notices when starting out with Wicket is the convention where Wicket likes having its html template files live at the same level and in the same packages as it’s Java source files. Sure you can jump through hoops to get Wicket to load the html template files from elsewhere but a nice compromise is to simply keep your html template files within the same package directory structure but in a source folder separate from the Java classes. Why? Well quite simply to keep your designers (Dreamweaver folks!) from having to grab Java source files along with the html files they are working on. It will just confuse them and clutter their directories.You can of course stick with the typical “Java source files along side html” convention if you wish, but I find it much cleaner to separate them during design time, and have Maven combine them only at build time into the target war (which it will gladly do automagically).
Project Folder Structure
.
|-- pom.xml
|-- src
|   `-- main
|       |-- filters
|       |-- java
|       |   `-- com
|       |       `-- mysticcoders
|       |           `-- mysticpaste
|       |               |-- model
|       |               |-- persistence
|       |               |   |-- exception
|       |               |   |-- hibernate
|       |               |-- services
|       |               `-- web
|       |                   |-- ajax
|       |                   |-- pages
|       |                   |-- panels
|       |                   `-- servlet
|       |-- resources
|       |   |-- com
|       |   |   `-- mysticcoders
|       |   |       `-- mysticpaste
|       |   |           |-- spring
|       |   |           `-- web
|       |   |               |-- ajax
|       |   |               |-- pages
|       |   |               `-- panels
|       |   `-- log4j.properties
|       |-- sql
|       `-- webapp
|           |-- WEB-INF
|           |-- images
|           |-- js
|           `-- css
- src/main: maven builds source and resources from this directory to the main deployable target (i.e. our war file)
- filters: we keep a set of “filters” files that maven can use to interpolate variables at build time. What does this mean? It means that inside your configuration files, the files you use to setup database connections or file paths, you can insert variable place holders like ${db.host}. When maven does a build, it looks up the correct filter file to use and looks for the key=value part corresponding to “db.host” and inserts it into the configuration file for you. This ensures that you are able to configure your application per environment you deploy to (i.e. DEV, QA, PROD, etc…) by having different filter files with the same keys but different values. For more information see Maven’s documentation on filtering resource.
- java/*: this folder will contain all of the
application’s source code. Everything from the database access code,
wicket code and services code for the mysticpaste application (see
below).
- model: all “domain” classes, that is, classes that represent the objects in the application. For mysticpaste you’ll see classes like “PasteItem” which represents an item pasted to the mysticpaste.
- persistence: at this level of the persistence
package a list of interfaces will be kept. The interfaces comprise the
basic access layer the services layer will use to save, retrieve and
update items to/from the paste bin.
- exception: the peristence layer needs to tell the services layer when things have gone wrong. It does this via delcaring and throwing exceptions.
- hibernate: such is our case, our persistence interfaces will be implemented via the ORM known as Hibernate. This package will store all of the custom hibernate implementations and hibernate specific classes
- services: The services layer will be stored here. Both the generic interfaces and their implementation classes. The persistence layer will be injected via spring.
- web: this folder is where our Wicket classes will reside and it’s split into several category packages which are as follows:
- ajax: mysticpaste uses Ajax to render portions of its UI. The wicket classes which render the xml/html to be injected dynamically into the page are stored here.
- pages: standard Wicket page classes which are used throughout the application are stored here
- panels: reusable panel classes are stored here. Panels may be included within Wicket pages for sake of templating
- servlet: any run of the mill servlet code we need is stored here. A good example might be an ImageUploadServlet
- resources/*: the resources folder will hold our non-java based files. Noteably html files and spring confguration files
- spring: Holds any spring configuration files needed to wire the services and persistence layer
- web: this folder and all subfolders mirror the packages under src/main/java/…/web and hold the .html files that the Wicket page/panel classes use as their templates. As described above, a “standard” wicket application simply stores the .html files along side their Wicket classes under src/main/java/…/web, however we want to keep these files separate from the Java source so as to keep the directory our designers checkout from version control contianing only the files they need to work on.
- sql: any sql scripts we need to keep handy for building the mysticpaste database.
- webapp: this folder will keep the files which live at the base directory of our war file
- WEB-INF: where you keep your web.xml file
- images: any image resource, .gif/.png/.jpg files your webapp will reference
- js: javascript files your webapp will reference
- css: style sheets your webapp uses
- src/test/*: All files which reside under this
folder are test classes and resources needed to support the tests.
Maven will build everything under src/main/java and add it to the class
path of the JUnit or TestNG classes you create.
- java: JUnit or TestNG test classes which will be run during a build
- resources: resource files which are needed to support the tests
Getting Started
Since we are using Maven as our build tool we can take advantage of the fact that the fine folks at the Wicket project have created a specialized “archetype“ which creates a skeleton web application complete with a folder structure which mimics roughly what we have outlined above and Maven pom.xml file used to build a war. The Wicket contributors have even gone one step further and have created a little web page which will, based off a few drop down options, generate the maven command you need to execute in order to create the boiler plate Wicket project. You can find this web page over on the Apache Wicket site under the “Quick Start” link.
Copying the above Maven command creates a Skeleton Wicket Project
mvn archetype:create \
-DarchetypeGroupId=org.apache.wicket \
-DarchetypeArtifactId=wicket-archetype-quickstart \
-DarchetypeVersion=1.3.5 \
-DgroupId=com.mysticcoders \
-DartifactId=mysticpaste
And I ended up with the following folder structure:
.
`-- mysticpaste
    |-- pom.xml
    `-- src
        |-- main
        |   |-- java
        |   |   `-- com
        |   |       `-- mysticcoders
        |   |           |-- HomePage.html
        |   |           |-- HomePage.java
        |   |           `-- WicketApplication.java
        |   |-- resources
        |   |   `-- log4j.properties
        |   `-- webapp
        |       `-- WEB-INF
        |           `-- web.xml
        `-- test
            `-- java
                `-- com
                    `-- mysticcoders
                        |-- Start.java
                        `-- TestHomePage.java
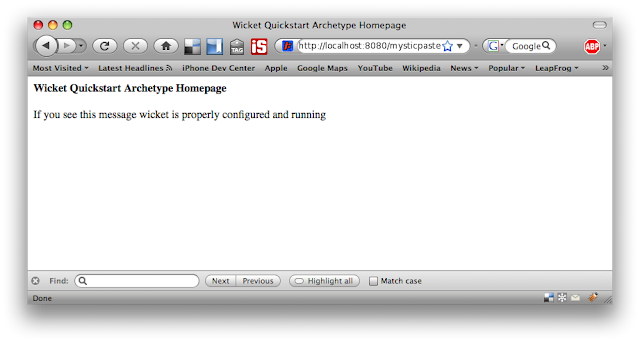
Now obviously we’ll have to rearrange a few things, for instance I
want my base package to be com.mysticcoders.mysticpaste, but that’s easy
enough to do once we are in an IDE. For now, let’s test this example
webapp out and see if it works. To do that switch into the mysticpaste
directory (the directory that has pom.xml in it) and type the following:mvn jetty:runThis will start up a Jetty webapp container running on port 8080 (if you have something running there already, use the -Djetty.port=<portNum> option). Startup a webbrowser and navigate to http://localhost:8080/mysticpaste/ You should see:

Your IDE
Sooner or later you’re going to want to crack open your IDE and start hacking away. Maven makes this extremely easy by allowing you to create IDE specific project files based off of the Maven pom.xml file.Eclipse
mvn eclipse:eclipseFor eclipse you’ll also have to set the M2_REPO classpath variable for the workspace your project resides under. Do this by entering the following command:
mvn -Declipse.workspace=<your_workspace_location> eclipse:add-maven-repoIntelliJ IDEA
mvn idea:idea -OR- in IDEA 7+ simply open the pom.xml fileNetbeans
Netbeans supports maven out of the box, just “Open Project” and choose the mysticpaste directory that contains the pom.xml file
When generating the project files through Maven, the project is setup such that classpath entries point to your local Maven repository (i.e. ~/.m2/repository, or C:Documents and Settingsyourusername.M2repository on Windows). It also sets up src/main/java, src/main/resources as “source folders”. You may add other folders to the source folder list as per your IDE if needed, the only thing you have to remember is if you ever use mvn eclipse:clean followed by mvn eclipse:eclipse again, those other source folders will have to be readded through your IDE. Instead, you should add the source/resource folders directly to your pom.xml, this way they will be maintained.
Spring
The Mystic Paste application will use Spring, and really you should too. Unless you have been hiding under a rock or work in a corporate environment so lame as to which technologies newer than 2002 are forbidden you should learn to accept Spring as a defacto standard. Dependency injection for the win!We add the following to our pom.xml:
<!-- Note: versions have been left off intentionally to future proof this article -->
<dependency> <!-- 1 -->
    <groupId>org.apache.wicket</groupId>
    <artifactId>wicket-spring-annot</artifactId>
</dependency>
<dependency> <!-- 2 -->
    <groupId>org.springframework</groupId>
    <artifactId>spring</artifactId>
</dependency>
<dependency> <!-- 3 -->
    <groupId>org.springframework</groupId>
    <artifactId>spring-test</artifactId>
</dependency>
<dependency> <!-- 4 -->
    <groupId>org.springframework</groupId>
    <artifactId>spring-tx</artifactId>
</dependency>
- wicket-spring-annot: allows us to wire our Wicket application via handy dependency injection annotations (i.e. @SpringBean, see Wicket documentation for more detail)
- spring: is just the core spring libraries
- spring-test: is a set of Spring integration classes for Unit testing
- spring-tx: is the Spring Transaction Management api for declarative transactions
web.xml additions for Spring
In order for Spring to manage our Wicket application we need to setup the Wicket filter with a Spring-aware application factory. This allows us to wire our Wicket Application class in our applicationContext.xml file, which is really handy if you have a services and configuration settings you want to inject into the Wicket Application object so the rest of your application can access them. To do this, we change the original Wicket filter like so: <filter>
<filter-name>wicket.mysticpaste</filter-name>
<filter-class>org.apache.wicket.protocol.http.WicketFilter</filter-class>
<init-param>
<!--<param-name>applicationClassName</param-name>-->
<param-name>applicationFactoryClassName</param-name>
<param-value>
org.apache.wicket.spring.SpringWebApplicationFactory
</param-value>
</init-param>
</filter>
As well, we want our Spring context to be available to our webapp if
ever there is a need for one of our pages to access the Spring managed
beans directly: <context-param>
<param-name>contextConfigLocation</param-name>
<param-value>
classpath:com/mysticcoders/mysticpaste/spring/applicationContext.xml
</param-value>
</context-param>
<listener>
<listener-class>
org.springframework.web.context.ContextLoaderListener
</listener-class>
</listener>
Hibernate
Hibernate is our ORM of choice, it will allow us to persist and retrieve our model objects to and from the underlying database, whatever that database may be.We add the following to our pom.xml:
<!-- Note: versions have been left off intentionally to future proof this article -->
<dependency> <!-- 1 -->
    <groupId>org.hibernate</groupId>
    <artifactId>hibernate-annotations</artifactId>
</dependency>
<dependency> <!-- 2 -->
    <groupId>c3p0</groupId>
    <artifactId>c3p0</artifactId>
</dependency>
<dependency> <!-- 3 -->
    <groupId>commons-dbcp</groupId>
    <artifactId>commons-dbcp</artifactId>
</dependency>
<dependency> <!-- 4 -->
    <groupId>javax.transaction</groupId>
    <artifactId>jta</artifactId>
    <version>1.0.1B</version>
</dependency>
- hibernate-annotations: used so we can annotate our model classes with mapping information, instead of having to create a separate mysticpaste.hbm.xml file.
- c3p0: provides a connection pooling library Hibernate can use
- commons-dbcp: another connection pooling library, we’ll add it as well and decide whether to use it or c3p0 later
- jta: this is the Java Transaction API which is needed by Hibernate (Hibernate provides an implementation of the API)
web.xml additions for Hibernate
To have a Hibernate Session open and ready for our webapplication during a Request Cycle we need to setup a Hibernate filter like so (otherwise, good luck getting lazy loading working!): <filter>
<filter-name>open.hibernate.session.in.view</filter-name>
<filter-class>
org.springframework.orm.hibernate3.support.OpenSessionInViewFilter
</filter-class>
</filter>
<!-- Important! This filter mapping must come before Wicket's! -->
<filter-mapping>
<filter-name>open.hibernate.session.in.view</filter-name>
<url-pattern>/*</url-pattern>
</filter-mapping>
As the comment states above, make sure this filter-mapping exists
*before* your wicket.mysticpaste filter or else it just plain won’t
work.Database
For the Mystic Paste we decided to use the freely available PostgreSQL. Adding support for PostgreSQL is very easy, unlike with some of the commercial DBMSes where you have to download and install their JDBC driver into your repository. To add support for Postgres, we simply add the following to our pom.xml:<!-- Note: versions have been left off intentionally to future proof this article -->
<dependency>
<groupId>postgresql</groupId>
<artifactId>postgresql</artifactId>
</dependency>
Servlets
Regardless of which webapplication framework you choose there are just some times when a plain jane Servlet comes in really handy. If you have a need for Servlets and the Servlet must have access to the Wicket session add the following to your web.xml: <filter>
<filter-name>wicket.session</filter-name>
<filter-class>org.apache.wicket.protocol.http.servlet.WicketSessionFilter
</filter-class>
<init-param>
<param-name>filterName</param-name>
<param-value>wicket.mysticpaste</param-value>
</init-param>
</filter>
And then, after your other filter-mappings add the following (assuming you mount your servlet-mappings under /servlet/): <filter-mapping>
<filter-name>wicket.session</filter-name>
<url-pattern>/servlet/*</url-pattern>
</filter-mapping>
Maven Filters and Profiles
In order to build our Mystic Paste project for various environments (DEV/QA/PROD) we need to implement both Maven profiles and filters.Filters
Filters allow you to place variables inside your configuration files and have those variables filled in durring build time. This is very handy for setting environment specific things such as database connection information.Enabling filters is quite easy, we open up the pom.xml file and find the section for <resources> and set the value for the <filtering> element to true as follows:
<resources>
    <resource>
        <filtering>true</filtering>
        <directory>src/main/resources</directory>
    </resource>
.
.
.
</resources>
But for filtering to work, we need to specify a filters file. It’s
not enough to specify only one filter file because we need to specify
different filters per environment and we’ll do that by using Maven
Profiles.Profiles
To setup a profile, create a new set of elements following the <build> section in your pom.xml file. Like so:<properties>
<!-- default env when no profile is specified -->
<env>DEV</env>
</properties>
<profiles>
<profile>
<id>DEV</id>
<properties>
<env>DEV</env>
</properties>
</profile>
<profile>
<id>QA</id>
<properties>
<env>QA</env>
</properties>
</profile>
<profile>
<id>PROD</id>
<properties>
<env>PROD</env>
</properties>
</profile>
</profiles>
and just above your <resources> tag underneith your <build> tag you would add the following elements:<build>
<finalName>mysticpaste</finalName>
<filters>
<filter>src/main/filters/filters-${env}.properties</filter>
</filters>
<resources>
<resource>
<filtering>true</filtering>
<directory>src/main/resources</directory>
</resource>
</resources>
</build>
src/main/filters will contain the following files.|-- pom.xml |-- src | `-- main | |-- filters | | `-- filters-DEV.properties | | `-- filters-QA.properties | | `-- filters-PROD.propertiesfilters-DEV.properties
jdbc.url=jdbc:postgresql://localhost:5432/mysticpaste
jdbc.user=mysticpaste
jdbc.password=password
image.upload.path=/tmp/pasetbin/userimages
image.upload.size.limit=4096K
filters-PROD.properties
jdbc.url=jdbc:postgresql://192.168.2.10:5432/mysticpaste
jdbc.user=mysticpaste
jdbc.password=CrYp71c
image.upload.path=/mysticpaste/userimages
image.upload.size.limit=4096K
Now within any file under src/main/resources that has variables of the form ${variable.name} will have those variables replaced with the values specified in the proper filters file located under src/main/filters. For instance here is an example of a Spring applicationContext.xml file which will be interpolated with proper variables values at build time:
applicationContext.xml
<bean id="photoServiceConfig"
      class="com.mysticcoders.mysticpaste.services.ImageServiceConfig">
    <property name="absoluteFilePath" value="${image.upload.path}"/>
    <property name="imageSizeLimit" value="${image.upload.size.limit}"/>
</bean>
<bean id="photoService"
    class="com.mysticcoders.mysticpaste.services.ImageManagementServiceImpl">
    <constructor-arg ref="photoServiceConfig"/>
    <property name="photoManagementDao" ref="photoDao"/>
</bean>
To determine which filters file will be used depends on the profile
chosen when building. For example, to build to production using the
filters-PROD.properties we would execute the following:mvn clean deploy -P PRODThe profile you use with the -P switch must match one of the values of the <ID> element for a profile.
Conclusion
Although it’s quite easy to get started with the Maven QuickStart project it is sometimes a bit frustrating putting some of the additonal pieces together. Building to several environments, setting up depenencies not included in the QuickStart project and structuring your project in an effort to make life easy for yourself as a developer and for your designer.
Comment:
In mysticpaste app, Wicket used SpringFamework with role of Beans Factory to createnew objects and manage Hibernate Transaction" at Dao tier.
2-Writing the tests (Ngày 2)
http://www.mysticcoders.com/blog/5-days-of-wicket-writing-the-tests/
3-Designing the backend (Ngày 3)
http://www.mysticcoders.com/blog/5-days-of-wicket-day-designing-the-backend/
4-Designing the Wicket components (Ngày 4)
http://www.mysticcoders.com/blog/5-days-of-wicket-the-ui/
5-Putting it all together(Ngày 5)
Here we are, the last day of our Apache Wicket series. While there was only one day that focused on Apache Wicket, we’ve laid the groundwork needed to get a J2EE project that uses a web framework off the ground. And step-by-step, if you follow along with the team on all 4 days preceding, you will have a greater understanding of how everything is put together, and why.
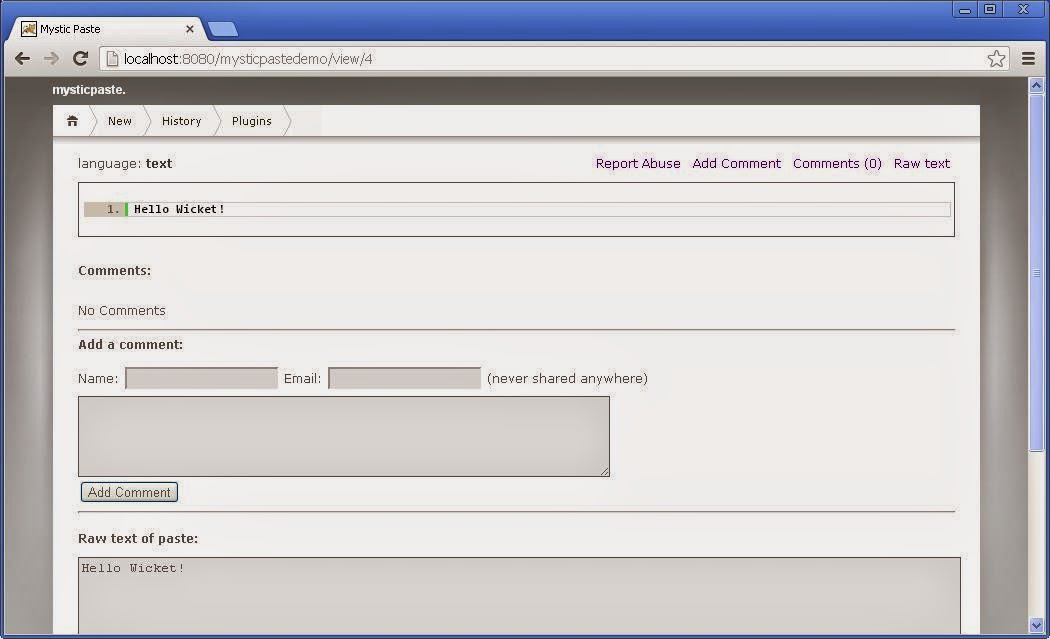
And as you can see, the actual work that went into the front-end of MysticPaste, didn’t take very long at all. And as good community citizens, we’ve made the finished product and source code available.
MysticPaste.com – our implemented pastebin based on the code examples and tutorials shown throughout this series
MysticPaste Source – the source code for the pastebin, open source.
On Day 1, we learned the many steps it takes to put together a project that can be worked on in a team environment. We’ve enjoyed your comments on different methodologies, and some we will definitely take into account. The biggest thing to take away from that day, is to understand the underpinnings of why things are where they are in a project, and how adherence to the fairly accepted Maven standard structure can make life much much easier.
On Day 2, we ran through some basics on Mocks, and with a bit of upfront design on interfaces, a testing harness is available for building out the backend. We also learned how to take Unitils and extend our tests passed just a functional unit, and move through many layers of the built system, and ensure we go a bit beyond just code coverage.
On Day 3, with unit tests in place, we felt safe writing some implementations so we moved the codebase from failing tests due to no implementation, to working tests. We learned a bit about designing your domain model based on requirements and design discussions, and molding the service and persistence layer to support your business goals.
On Day 4, we got to the most exciting part of our journey, Apache Wicket. The article walked you through some of the basics of putting a page together using markup inheritance, and amazingly enough, how this simple act removes the need for technology so common in the MVC world to support this. Best of all, because its all in Java, ultimately you can actually use your IDE and refactor or debug as needed. Each of the most basic components with forms, and display, and the wicket-based tags that act as extensions to your HTML pages, were reviewed with links off to the Javadoc for further discovery. One of the many reasons to love Wicket, is the clear separation of functional concerns, no code in your template pages, it’s just HTML.
If you’re like the members of the Mystic team, you will CRAVE more. More information, more discovery into how we can fully integrate Apache Wicket as a tool in our arsenal. Aside from downloading the distribution and following along with our tutorial, here are some options ahead:
- TSSJS / LV – Architecting Applications using Apache Wicket – A talk at the symposium by Andrew Lombardi about Apache Wicket.
- Apache Wicket Training – Mystic is available for corporate trainings, and is in process of putting together a schedule for different technologies to learn about in 2009. If you’d like to have us come to your business, have your manager contact us at: trainings@mysticcoders.com
What’s next?
With the concepts in these articles, we’ve laid the groundwork for many more short articles on interesting technology in the future. There is definitely a lot of new and interesting items we can add to MysticPaste without overcomplicating the streamlined interface, such as:- Syntax Highlighting
- Embedding AJAX where it makes sense
- Remote Interface to the API for pasting from IDE’s
- IRC-based bot integration
6-Deploy app on localhost:
Compile và run above application from eclipse&tomcat:

7-Comment
"5 days of wicket" is a medium project to explore wicket framework for beginners. This is a framework that allows specialization of "design" team and code team so that java web applications will have UI more attractive. Notes that UI is a problem so that many java applications are "failed" in Việt Nam. Spring still is an IoC framework used in business layer. Thanks you Wicket!


0 comments:
Post a Comment